Monday, March 31, 2014

First Competition


Recently I have caught wind of a local fly fishing competition that will be taking place and instantly my interest was peaked. The competition is being organized and run by the Sotto Fly Fishing Club ( www.sottoflyfishing.com ) and after talking to the gentleman running the show I was very impressed and excited about his enthusiasm and passion for fly fishing. I think this will be a great day of learning for people like myself who are fairly new to the sport and are looking to take things to the next level.

I have never entered a formal fly fishing competition or event in the past, although to be honest there are not many opportunities here in South Western Ontario to do so. Most of the time I have been intimidated or turned off by the few events that have taken place when looking at the LONG intricate list of rules and regulations that are in place for the different events. The rules that are most often used and referenced seem to be the FIPS- Mouche and as you can see from the linked document it is long, intricate and very particular. I am glad that for this competition the rules have been simplified as I think the full FIPS rules turn many new anglers away from competing.

The location of the event is Lyndon Fish Hatcheries in New Dundee, Ontario. The entry fee is $25+ tax. Below is a picture and some more information about the venue that this competition will be held at.


 "The pond is approximately 400,000 gallons, it has an average of 600 gallons per minute flowing through it. In the deepest parts it is 10 feet deep. We try to maintain, an average of 2,000 fish in the pond on a continual basis. The average size is approximately 2.5 lbs but fish have been as large as 13 lbs. "

In the coming weeks I will be preparing rigs, flies, rods and reels and making sure everything is order and ready to go for the competition. I am beginning to formulate a game plan and we shall see how things turn out.

More Information:
Sotto Fly Fishing Club: http://www.sottoflyfishing.com
Rules: http://sottoflyfishing.com/2014/02/22/the-rules/
Competition Hooks: http://sottoflyfishing.com/2014/03/27/newsletter-competition-hooks/

Sunday, March 30, 2014

Preparation Is Key


“By failing to prepare, you are preparing to fail.”
― Benjamin Franklin


When tying flies I find lots of mind numbing activities that lend well to being done while watching a movie or otherwise paying attention to something else. Preparation of  materials such as feathers for wings or crest for tails on salmon flies can be time consuming if being done fly for fly. By processing a large amount at one time you can have plenty of prepared materials on hand for the next year or two of tying making certain styles of flies more enjoyable to tye. Here are a few of the things that I do in advanced to be prepared and allow myself more time at the vise tying.

Bronze Mallard - When tying classic salmon flies or spey flies bronze mallard is a feather that is used very often as wings. Finding good quality feathers can be tricky but is worth the time and effort in the end. Once you have found a good supplier you can deal with the odd feather that is damaged, ruffled or ratty by steaming them.

I use bronze mallard from a Canadian company that sells them in 12 pairs (24 feathers, 12 left, 12 right) for $7-8. I purchased 5  packages and then spent an evening processing, steaming and sorting them so I would save time when tying at the bench.


Step 1: First I stripped the fluffy base fibers from both the left an right side of the feather and then stripped back the off side of the feather as well. I roughly sorted the feathers into three grades at this point and kept the lefts and rights together.


Step 2: At this point I took any feathers that were ratty, damaged, twisted or other wise unsavory and steamed them. You can use a kettle, electric kettle or what I do is take a pot with a tight fitting lid and only lift one side to direct the steam. After steaming you can gently caress the feather to marry all the fibers together. Once steamed place somewhere to dry.


Step 3: Allow the feathers to dry over night before placing in a storage container sorted by size and left or right. At this point when tying a fly that requires bronze mallard wings I simple select a left and right feather in the correct size for the hook and keep on tying. This stash should last me a good long time and represents around 3 hours or so of work and effort. If you are a presentation fly tyer you may find washing the feathers with a mild dish soap and allowing them to dry before preparing will be beneficial. However as a person who ties fishing flies this is pointless to me, I will get them wet and washed on the end of my leader.


Golden Pheasant Crest - When tying classic salmon flies, spey flies, or even steelhead flies golden pheasant crest comes into play a lot of the time for tails. As always you want to find the best quality materials that you can but even the best GP crests still have some longer feathers with twisted fibers. Preparing an entire head or two at the same time can be a little labor intensive but will save you time when tying down the road. The method outlined below will help give you straight feathers that will be perfect for tying in tails on many different patterns.

Step 1: Pluck an entire head and size the feathers roughly into three different groups, small, medium, and large. Once the head is plucked entirely and sorted take three small glass dishes, fill them with hot tap water and a SMALL dab of dish soap and place the different size feathers into their own dish. Allow the feathers to soak for 8 or so hours stirring occasionally.

Step 2: After the soak you want to find a baking sheet or some other large flat surface. Take each feather one by one and lay it flat on its side on the sheet. This is the labor intensive part and can get really mind numbingly boring. Once you have all the feathers laid out allow them to dry for 24 hours before placing into storage. Those who tie presentation flies will place the feather on the sheet and then with a bodkin separate the fibers of the feather to create the cascading effect when tied in. For someone who ties fishing flies this is not needed.


Articulated Shanks - When tying intruders or stinger hook patterns in the past I found that the most time intensive part was preparing the waddington shanks or hair pins. If I came home from work and wanted to tie a few flies I could easily spend half of it on just preparing the shanks. Instead I take a few hours and pre tie the shank bodies that I plan to use and set them aside stuck in foam or in a container. It usually takes me around 2-3 hours to tie up 2 dozen shanks and I find when sitting down after work to tie a few flies I can get a LOT more done as I am spending all my time tying and none of my time preparing shanks.


Other Activities - There are all kinds of things you can prepare ahead of time to make tying a batch or order of flies that much easier. When you have down time watching T.V, taking a lunch break at work, or otherwise doing something that does not require your full attention preparing materials be very productive.

- Preparing hooks with beads, lead/lead free wraps, cone heads etc.Preparing a dozen or so flies you plan to tie ahead of time with under body weight or bead heads can save time when you get down to tying.
- Prepare feathers for soft hackles, buggers, etc. Stripping and preparing feathers ahead of time can save a small amount of time.
- Knotting pheasant tail on the stem for grasshopper/terrestrial legs.


The list can go as far as your imagination really.

Thursday, March 20, 2014

When It All Comes Together

I have been putting in lots of time recently tying up flies for steelhead, most spey flies and articulated stuff. I have really been starting to get into the swing of speys and bronze mallard wings lately though it seems. Some nights are still better then others in setting wings and creating bodies, but for the most part I can set a pair of BM wings in one try. Here is a Blue Ice Spey that I tied up this afternoon and am really happy with...now if only my photography skills could be better.


Here are a few more that I have tied up recently.

  
Silver Streak


Steelhead Candy (Evil Twin)

Wednesday, March 12, 2014

Chrome Dreams Into Reality


 I was sitting here today thinking back on my first steelhead and figured it may not be a bad idea to carry over the article I wrote the afternoon of catching my first steelhead on the swing. It was an amazing experience and once that has changed the course of my life I am sure. Enjoy.

 ------------------------------------------------------------------------------------------------------------------
November 4th 2012

One thing has consumed my mind and free time this fall...Steelhead.

I have spent countless hours researching these beautiful fish, how to catch them, their biology, habits and history...you name it I would read it to try and get a better grasp on what I was up against. I even went as far as to enroll in a Steelhead clinic to try and learn any tips and tricks that I could to land my first steel beauty.

After coming back from seven trips empty handed I choose to head to a river that feeds a great lake I have yet to fish this year. I showed up at the bridge at around 8:15am and was shocked to see 20+ cars parked on the side of the road. As I parked and got setup I noticed 2-4 people exiting a few of the cars...I estimate that there was easily 40-60+ people fishing up this stretch of the river this morning.

 I tied on a fly a friend of mine had given me to start off my trip. It was a black salmon hook, a bit of  purple and blue flash, bluejay hackle, and some jungle cock eyes. I worked my way upstream from the bridge seeing as most of the float fisherman were sitting downstream and started into the groove of swinging flies. I worked my way up to the bottom of the first pool and started working the far side as I could see a few seams, changes of current and a bit deeper water. I worked this pool up the side for around 45 minutes at which point I switched over to a mcflyfoam egg and started wading further upstream. I was tossing in big mends to try and get my egg down to the bottom but I was not having all that much luck. I spent another 45 minutes or so wading up to the bottom of the next pool and started working a nice section again on the far side of the bank with some nice seams and deeper water.

At this time I watched a few float guys walk up to the start of the last pool I had fished. The first cast one of them had on a nice fish and I started to ask myself why can he pick a fish out of a run that I just went through without any luck. My first train of thought went to getting my fly down to where the fish are holding. I took off my intermediate leader and exchanged it for a 10' fast sinking rio leader. To this I tied on about 3 feet of 12 pound test tippet material and then tied on another egg and started working back through my current run. This started to get my egg down into where I figured the fish were holding so that was a good start.

Around this time the float fishermen below me walked back into the woods looking for other waters to fish and I figured I would wait a while and then wade down and try the pool again. I figured that there had to be a reason the fish he had caught was holding in that pool, and perhaps another fish would take up the cover or feature if I waited a bit. I was not feeling confident with the egg at this point so I tied on my confidence fly. A size 6 Foxee Clouser tied with red flash in the tail and a red dumbbell eye. I waded down and started to work the pool from a logjam right at the start of the run. I would toss my fly straight across the pool and allow it to swing through with the current. I worked my way down and right at the tail of the pool my swinging fly was struck hard. I set the hook and was into what felt like a good sized fish.

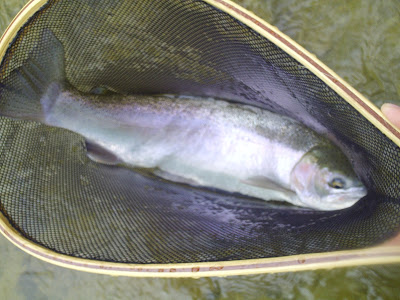
Excitement welled up inside of me and I started to pay very close attention to what I was doing. I let the fish run a bit while keeping tension on her and started my first dance with the chrome beauty that had haunted my dreams. I would let her run and then bring in the slack and try to direct her into shallower water so I could net her. Each time she would come into shallower water panic would strike and she would make another run for the pool. We sat and played this back and forth game for several minutes until the fight in her started to wind down. At around the three minute mark I was able to coax her into shallower water, wet my net and finally land her safely...my chest swelled as I stared in awe at the beauty of my prey. I grabbed my camera that is always at the ready in my wader pocket and snapped a quick picture while she was still submerged in the net.


I then gently positioned my hemostats to remove the foxee clouser from the inside of her mouth. I gently placed her in the shallower water beside my rod for one more quick picture...the quality of both pictures are not all that great, they were very quick and hurried as I wanted to return this beauty back to the river system as quickly as possible unharmed.


After the picture I grabber her by the tail, positioned her into slower moving current on the sides of the river and waited for her to recover. Once I felt her strength return I let go and watched as she briskly swam downstream.

I stood in wonder, my heart pounding as I basked in the experience of what just transpired seconds before. I had achieved my goal. I thought back on my previous trip...the 7th outing in a row spanning 2 months. Not a single hit, a single whiff of the presence of fish, or an ounce of luck. Even at that moment I still had the want and drive to continue forward towards my goal of landing a chrome beauty...and as I stood triumphant in the brisk November air I was glad that I never faltered or let doubt creep into my mind.

Side Note: For those interested in size and weight, length was 21-22", which would put this fish at around the 3.5-4lb mark from what I can tell.

Monday, March 10, 2014

Fly Fishing Tips - Clear Tubing Shot Dispenser and Articulated Fly Storage

  Here is a video I made last year showing two uses for clear plastic tubing sold by U-Line.ca. These tubes are great for storing articulated flies safely so you do not damage the at times delicate hackle and feathers. Another use is to create a convenient shot dispenser that allows you to place a few pieces of shot into your hand while on the river instead of fumbling around and dropping it into the river.


Sunday, March 9, 2014

Hair Pin Intruder Shanks

So I slapped together a little video here to show how to use 3"
straight hair pins to make intruder style shanks for articulated flies. I
have been tying on these pins exclusively for a while and have come to
like how cheap they are, how easy they are to prep, and how effective
they are.


Monday, March 3, 2014

Trailing Hook Review (Intruders - Stinger Flies)

I have spent a lot of time playing around with many different materials for attaching stinger hooks to intruder and articulated patterns. Everyone seems to have their own preference and reasons for using different things so I figured I would make a post and share with everyone some of my observations and preferences.


Beading Wire: The first time that I saw wire used for intruders was when a friend of mine tossed me a pattern tied with senyo's intruder wire and shanks. The stiff wire kept the stinger hook straight back from the fly and was still nice and flexible. When I asked how much it was for a package of the wire material I laughed and started looking around for beading wire as a cheaper alternative. I came across a certain brand of wire, Econoflex wire made by the Soft Flex company. It usually runs from $3-5 per spool depending upon the type and has the breaking strength printed right on the package. It comes in  wide range of colors, red, black, white, blue, chartreuse etc, as well as different breaking strengths and weaves. The wire is coated in nylon and I have been using the 15lb and 20lb breaking strength wire that is 1X7 strands. I have put these up against a few steelhead without any problems, and more impressively 20-30lb Chinook Salmon. When hooking large salmon I never had a single wire break or fail on me, more often then not it was either the tippet material or the hook itself that would bend out or break.

Pro's: 
Cost - At $4-6 per 30+ft roll the price is right and you get lots of use out of a single spool of wire.
Color and Size - The choices in color and size of beading wire is vast which will allow you to find something suitable for what you are tying.
Orientation - Using this wire your hook will stay in line with your fly but still has flex and bend to it when you do hook a fish.

Con's:
Kinks - If you set the hook wrong while tying or fight a few large fish the wire can develop a kink in it.
Availability - The specific brand that I like can be hard to find here in Canada. Lens Mills is the only place that I have seen this specific brand. Aside from that your options are ordering it directly from the Soft Flex company in the U.S, or find alternative wires.
Breaking Strength - Not all wire's list the breaking strength. It would be a smart idea to test the wire if the strength is not listed before tying up a dozen flies with it.


Braided Line: I have played with braided line in the 20-60lb range and while many people like and enjoy using it I do not really care for it. I find it is very soft and droopy usually hanging down from the fly as it swings especially with heavier stinger hooks. That being said TONS of people use braided line for attaching hooks and have no problems with hooking up, for me its just a personal preference and prejudice perhaps.

Pro's:
Cost- Relatively cheap, usually $20-30 for a very large spool that will last you a life time.
Availability - Easy to find in any tackle shop or outdoors store.

Con's:
Sag: Hook usually droops below the fly while swinging unless in heavier current.


Crystal Fused Fire Line: This material I would have to say is my favorite and I prefer to use the 30lb test variety. It is a stiffer material that holds the hook straight back behind the fly nicely, but is still soft and flexible. It is white but can be colored with permanent markers (I usually do not bother). I find myself coming back to this material for tying my trailer hooks in time and time again. Once wet it does soak in a bit of water and gets a little softer but not nearly as much as regular braided line. Fire line also makes a few different lines that are very good for trailer hooks, I was given a sample of some 30lb fire line (black coating) by a friend that was a little thinner then the crystal and a tad bit softer, but not as soft as braided line that I did enjoy using as well.


Pro's:
Stiff - The material is stiff enough to hold the hook straight back from the fly while swinging, but is not as stiff as wire.
Durability - The 30lb braid is the lowest I will go when using this material for trailing hooks, and is very durable and does not break down after multiple fish.
Cost -A 300 yard spool of Crystal will cost you roughly $25-30 and last a lifetime unless you are tying commercially.

Con's:
Diameter - The diameter can make things tricky for threading smaller hooks. When using smaller hooks make sure to have a nice clean cut before threading the line through the hook.
Availability- I had to look around pretty hard to find a spool of the 30lb crystal as most places only stocked upto around 14lb. I ended up finding this spool at the Bass Pro Shop in Vaughn, Ontario.


So these are a few of the materials I have played around with extensively and some of the pro's and con's for them. I am curious if you prefer to use something else that I have not listed here? Feel free to comment with your input or tips and tricks. My next blog post will show how I go about attaching a trailer hook to a shank and making it bulletproof in the process.

Tight Lines!